Sway
SWAY is a presentation program that students and teachers have the ability to use within our Office 365 accounts. Teachers will learn how they can create visually appealing SWAY presentations to present instructional content or have their students show what they know by creating their own SWAY. This creation tool has built in search features that make research projects, book reports, and digital storytelling easier and faster than ever before.
Session Objectives:
- Create a Sway from start to finish
- Share your finished Sway with others
- Collaborate with others on a Sway
Success Criteria
- I can create a Sway storyline using cards.
- I can add images to a Sway using, automatic, stack, comparison, slideshow, and grid.
- I can design a Sway using the remix feature.
- I can share a Sway.
Bell Work
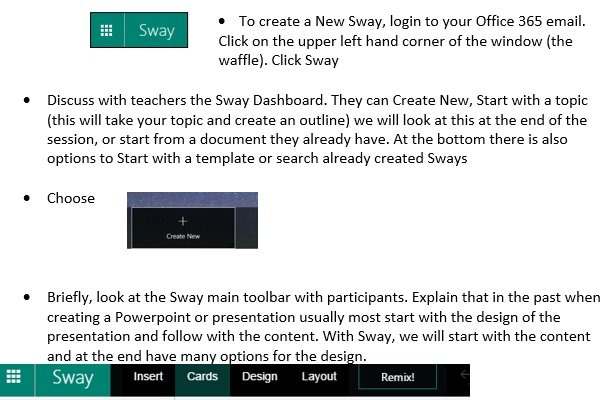
Task 1: Creating a New Sway
Task 2: Create and Organize Storyline
- After clicking Create New, the Create & Organize area opens.
- This is the canvas where the Sway will be built.
- It begins with a Title Card at the top.
- To add a title, click where it says Title your Sway. Type Tennessee
- A background image may be added in the background placeholder.
- On the Title Card, the background image will cover the entire page.
- Once clicking on the background image on the left-hand side Suggested appears. This will give images for the heading topic related to your Sway.
- In the box for Suggested type Tennessee map. Have participants choose an image for their Sway and click add.
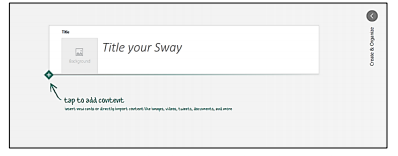
Task 3: Adding Content
- Content is added as Cards to the Storyline.
- To add cards, tap on the green diamond shape with the white plus sign below the Title Card or any card that is added to the Storyline.
- The text card allows you to add text to your Sway. The text card has six options:
- o Heading will add larger text that will act as a heading. A background image can also be added. o Emphasize will bold the text.
- o Accent will italicize the text.
- o Bullets will add bullets for a bulleted list.
- o Numbers will add a numbered list.
- o Link will allow some or all of the text to become a web link.
- o To delete the card, click on the trash can in the upper right hand corner.
Task 4: Preview Sway
- Select Play at the top right to preview the Sway
- Notice the arrows at the bottom right
- Select the Pencil at the top right to edit the Sway
Task 5: Group
- Group allows the creator to group pictures in different formats.
Task 6: Preview
- Select Play at the top right to preview the Sway
- Notice the arrows at the bottom right
- Select the Pencil at the top right to edit the Sway
Task 7: Sharing
- Sways can be shared in a variety of ways.
- To share your Sway, click on Share in the upper right area of the window.
- Shared by Link
- Anyone with this URL will be able to view this Sway.
